Friday, February 14, 2014

7x7 Big Eats 2013 - Wing Wings


Location: 422 Haight Street, San Francisco, California 94117
Date: Friday, January 17th
Food: Angry Korean Wings
Price:$6.00 (for 5)
Comments: These technically shouldn't count towards the list because they were consumed in 2014, not 2013. But since the 2014 Big Eats list was not-yet-released @ that point, we let it slide. I thought the wings were neither angry nor were they Korean. They were just sort of sweet, & maybe a little tangy. Perhaps the fact that these wings had sat in a box for a couple of hours before reaching my palette had played against my experience...but I didn't expect flavor to just completely disappear. For the same price, I would actually recommend the Papalote salsa wings...they were muy delicious.

Friday, January 3, 2014

From the Oven - Baked Lamb Shanks

HAPPY NEW YEAR

One of my goals this year is to allow myself more opportunities to enjoy the people, places, & things I love...like food!

A while ago Russell's mom brought us a couple of lamb shanks; but we hadn't found time time to cook it until things slowed down for the holidays.

When it came time to look for a fail-proof recipe to treat my lamb shanks, I turned to the place that I have learned not to doubt: America's Test Kitchen. I have always loved America's Test Kitchen because it is scientific & it is their job to takes out all of the guess-work for the home cook. Unfortunately, there was not a recipe for lamb shanks there...@ least not 1 that I can get without providing my credit card information.

Next I turned the search over to my good friend Google (it beats Bing...I've tested it) & the result was overwhelming. Most of the recipes call for a large dutch oven - which I don't have - & for braising the lamb shanks in a good amount of liquid at a high oven temperature for 3-4 hours. The only recipe that was different was one from Jamie Oliver which called for minimal equipment, lower oven temperature, & a shorter cooking time. Can anyone say perfect?

The Prep List...
   2 lamb shanks (~3 pounds total)
   4 sprigs of fresh rosemary
   3 sprigs of fresh thyme
   8 fresh sage leaves
   3 tablespoons butter, slightly softened
   1 large carrot
   0.5 yellow onion
   1 leek, well rinsed
   6 cloves garlic, unpeeled
   6 ounces white wine
   Olive oil
   Salt + Black pepper

Step-by-step Instructions...   
   Roughly chop up the leaves of 2 sprigs of rosemary, all 3 sprigs of thyme, & 4 of the sage leaves
   Thoroughly combine the chopped herb with the softened butter
   Using a small knife, separate the meat of each lamb shank from the bone, creating pockets
   Evenly distribute the herb butter into the pockets on the lamb shanks, set aside
   Peel the carrot and dice into small pieces; Thinly slice the onion and the leek
   Tear out 2 pieces of foil (about 10x12) and divide the vegetable & the garlic cloves onto each
   Oil the lamb shanks, season with salt & pepper, & place 1 on each pile of vegetables (bone sticking up)
   Place 1 whole sprig of rosemary & 2 sage leaves on top of each lamb shank
   Gather the foil & pour in the white wine; close it tightly around the bone to form 2 packets
   Place the packets onto a baking sheet & bake at 350F for 2.5 hours


Makes 2 servings

The result was tasty but a little too oily. The lamb shanks were tender & flavorful thanks to the pockets of herb butter. While we certainly enjoyed the animal protein, the vegetables on the bottom were even more delicious. The onion & leek were extremely tender & sweet, & the carrots were not the least bit crunchy or grassy...just the way I like them. We ate the dish with rice (poor planning) but it would also go well with rice pilaf, creamy polenta, mashed potatoes, or even mashed cauliflower!

Friday, December 27, 2013

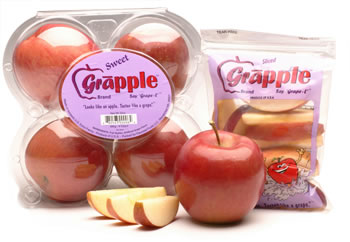
What the Food?!? - Grāpple Apples

The other day, Russell brought home something that has inspired me to start a new blog topic to celebrate all food & food-like products that should not exist; at least not in my own opinion (or diet). I have decided to title this topic "What the Food?!?"...or WTF?!?

To start off this new category, let me introduce you to the Grāpple. Pronounced "grape-l," not "gr-apple."

As the name suggests, this fruit is a combination of an apple & grapes. It is not a genetically engineered/modified hybrid fruit. According to the manufacturer, a Grāpple is a Fuji or Gala apple that has been given the flavor of concord grapes via a "bath" of artificial flavoring agents & water. And since the actual composition of the apple is not changed, the nutritional value of a Grāpple is the same as the unaltered apple it is made from.

A package of 4 Grāpples sells for $3.99 @ my local produce market. The price is not exactly expensive as the same amount (in weight) of Fuji apple is $3.61 and the same amount (in weight) of Gala apple is $2.70.

When Russell brought the package home, my first impression was being taken aback by a overwhelming, artificial fragrance. It reminded me of cheap grape-flavored candy...even worse than grape-flavored cough syrup!! On appearance, all 4 apples had some sort of defect such as bruising or rotten spots. When I took my first bite, the flavor of the fruit was not grape'y as promised on the package. The texture of the apple was OK but it wasn't any different from a normal Gala apple. It took a lot of effort to ignore the grape'y smell but once I was able to do it, I realized the apple itself wasn't even sweet to begin with.

I don't understand why a Grāpple exists!!  Apples & grapes are tasty, nutritious snacks by themselves & they really don't need to be messed with!!  For me, I will continue to eat my apples & grapes separately. The food industry is constantly coming up with novel products to attract the attention of today's consumers; but the Grāpple?? No.


Monday, July 29, 2013

From the Oven - Chocolate Cupcake with Raspberry Buttercream Frosting

The week before my GRE there was some serious cramming.  I was doing practice problems during my lunch break @ work; I was studying on the bus; & for a couple of nights, I would do practice tests...often starting at 9pm & finishing at 11:30pm.

Since I couldn't go to sleep immediately after all that studying, I found myself watching episodes of DC Cupcakes on the tiny screen of my iPhone.  I have always loved cupcakes & - before it closed - my absolutely favorite cupcakery is Everything Frosted in New York's Chinatown.  But as much as I love eating cupcakes, I have never tried to make them; I think the frosting scared me away.  Watching all those episodes of DC Cupcakes really inspired me & with the GRE now officially in my rearview mirror, it's time to give it a whirl.

Not your average cupcake recipe, but the frosting is pretty standard...
   For the chocolate'y cupcakes
      0.3 cup unsweetened cocoa powder
      0.5 teaspoon baking soda
      0.5 cup boiling water
      0.25 cup unsalted butter, melted
      0.15 cup vegetable (or neutral) oil
      1 cup granulated sugar
      0.75 teaspoon vanilla extract
      0.5 teaspoon salt
      1 egg + 1 egg yolk
      0.25 cup heavy cream
      1 cup all-purpose flour
   For the farm fresh frosting
      1 cup unsalted butter, softened
      2 pints fresh raspberries
      0.5 teaspoon vanilla extract
      Pinch of salt
      2 cups powdered sugar (more/less depending on the desired consistency)

Now to put it all together...
     Whisk together the cocoa powder & the baking soda in a heat proof bowl
     Add the cocoa powder mixture to the boiling water & stir until the bubbling subsides
     In a medium mixing bowl, whisk together melted butter, oil, sugar, vanilla, & salt
     Add the egg & egg yolk 1 @ a time, mixing thoroughly after each addition
     Add in the chocolate mixture & blend until fulling incorporated
     Add in the heavy cream, blend, & then slowly stir in the flour
     Evenly portion the batter into a lined cupcake pan (~ 2/3 full)
     Bake at 350F for 17 minutes or until a toothpick inserted in the middle comes out clean
     Once baked, remove cupcakes from the pan & let cool completely on a wire rack
     In a small sauce pan, cook down the raspberries
     Strain raspberries through a fine-mesh sieve & return liquid to the stove; reduce until thick
     Once the raspberry liquid has reduced to about 0.5 cup, let cool for 15 minutes
     In a large mixing bowl, combine softened butter, vanilla, salt,  & raspberry sauce
     Cream the ingredients with an electric mixture until well combined
     Add in powdered sugar 0.5 cup at a time until the proper consistency is reached
     Put frosting into a piping bag & decorate cupcakes as desired


Makes 12 cupcakes

Separately, the cake was moist although the edges were slightly dry. The frosting tasted great but it wasn't very fluffy because I was afraid to add too much powdered sugar...it was so sweet already.  Together, however, the chocolate flavor pretty much covered up the raspberry entirely; maybe additional sugar in the frosting would have helped?  If I am being honest, I did a horrendous job frosting the cupcakes.  My original intention was to do a simple swirl but the piping bag tip I have is way too small & so I had to go around & around the cupcake...thus creating what kind of looks like a pile of turd!  I am not trying to be gross since this is a food blog but look @ the picture & tell me I'm wrong.

All in all, I would say this 1st attempt was a semi-success.  Next on the list are a Nutella cupcake with chocolate buttercream frosting & an angle food cupcake with strawberry whipped cream frosting.  But before I start on these next attempts I am going to spend some time learning how to properly make frosting & how to properly frost cupcakes.

Monday, July 22, 2013

Playing with My Food - Cling Wrap Poached Egg

Our cat has a strict routine.  Every morning @ approximately 5:56am Sheldon would reach his claws under the blankets & "play tag" with my toes.  After being threatened to get kicked off (literally) the bed a couple of times,  Sheldon would proceed up to my pillow where he'd settle down comfortably next to my head & begin to munch on my scalp/hair.  On a work day my alarm goes off @ 6:00am so it's not usually such a big deal; but on the weekends when I don't have an alarm, it's really annoying.  So what does Sheldon's morning ritual have to do with what I'm writing about?  I'm getting to it.

This past Saturday morning Sheldon gave me the usual morning call & after giving him breakfast, I was desperately trying to fall back asleep.  You see, it was GRE day & for me, standardized testing and sleep deprivation just don't mix.  One tried & true way to get me to quickly fall asleep is to have me watch a show - any show - while in a comfy position (e.g. in bed).  So I picked up my phone, opened up Netflix, & began browsing for something to watch.  As I scrolled, I stumbled upon a PBS show called The Mind of a Chef featuring chef David Chang of the Momofuku empire. Did I mention the show is produced by Anthony Bourdain?  Anyway, the plan was to watch this show for 10-20 minutes, fall asleep, & go on with my day.  I finished the first episode (~20 minutes); then I watched the second episode; then I woke Russell up & we watched the 3rd episode; then we got out of bed & watched more episodes until it was time for me to leave to take the GRE. To say I was hooked on the show is a little bit of an understatement.

The GRE went well enough & the rest of Saturday passed with Russell & I stuffing our faces with oysters before heading home to watch more episodes of Mind of a Chef.  This pattern of "obsessive viewing" continued for parts of Sunday when all of a sudden Russell decided he was going to try out one of the cooking techniques featured in the show; the one where David Chang poaches eggs in little packets made of cling wrap.

The process is simple...
     Put a good-sized piece of cling wrap over a small bowl or ramekin
     Spray the cling wrap with a little bit of non-stick spray & sprinkle on some salt & pepper
     Crack the egg into the cling wrap & bring up the sides, making sure to remove all the free air
     Take a piece of string or a strip of cling wrap& tie off the packet.
     Place the packet into barely boiling water & let it cook for 4 minutes
     Careful unwrap the packet & remove the cling wrap from the egg


When we unveiled the egg it looked a lot like a ball of fresh mozzarella cheese but once we cut into it, the gooey yolk started to run out just like a regular poached egg.  According to other recipes for cling wrap poached egg, you can use any kind of oil & seasoning to flavor the egg before it is cooked.  This technique for poaching eggs is so quick & simple compared to the traditional methods of making a vortex or adding vinegar to the water.  Before I knew about this technique, my eggs would either get stuck at the bottom of the pot or half of the egg white would float off in little chunks.

Later on in the show chef Wylie Dufresne (wd~50) demonstrates his interpretation of Eggs Benedict & he remarks that Eggs Benedict is a dish made with eggs topped with more eggs (Hollandaise sauce is made with egg yolks).  This was a total lightbulb moment for me!  It's so obvious I can't believe I had never seen it like that before.  I repeated this statement to Russell & he said the idea of egg-on-egg is too "gratuitous." To simply matters, we came up with a brilliant idea: to replace the egg yolk with Hollandaise sauce.  Now we just have to experiment until we can get it done.

Tuesday, July 16, 2013

Quick & Easy - Cream Cheese Pancakes

A while back, I suggested to Russell that we should try eating gluten-free for a little while; partly because I wanted to learn more about the diet & partly because I wanted to see if we would feel any different.  To prepare for this adventure, I did a lot of research on Pinterest (where else?) and found a recipe for these pancakes that doesn't require the use of any flour whatsoever.  Interesting...  I pinned the link to my recipes board & forgot all about it.

A few Saturdays after I found the recipe I woke up craving pancakes but I didn't want to go through all the labor of making traditional buttermilk pancakes; not to mention I didn't even have buttermilk in my house.  Frustrated but not ready to give up, I got on my computer to start browsing for options when I stumbled upon the G'free pancakes again.  I wasn't exactly in the mood for experimenting with a new recipe @ 9am on a Saturday morning but my craving was too strong & I gave in.

I didn't have to buy black bean or garbanzo bean flour...
     2 ounces cream cheese
     2 eggs
     1 teaspoon sugar
     0.5 teaspoon ground cinnamon

This is the quickest pancake batter ever...
     Combine all the ingredients in a personal-sized blender & blend until combined
     Let the batter rest for 2 minutes
     Pour one-quarter of the batter into a well greased pan & cook for 1 minute per side


 Makes 4 pancakes

The end product looked more like crepes than pancakes because they were think with a lacy boarder rather than hearty and fluffy.  I guess that's to be expected since there is no leavening agent in the batter.  In terms of texture, they were close to the real thing but they did feel slightly spongy & perhaps "squeaked" between my teeth on occasional bites.  I liked that these pancakes were not too sweet so I could add fruit, powdered sugar, or syrup to them without taking it overboard.  I added a "relish" of macerated cherries this time because I didn't have any maple syrup @ home & I had gotten some delicious cherries from a work gathering a few days before.

I made the mistake of trying to flip the pancakes before the 1 minute was up.  Big mistake.  These little sheets were so thin & delicate they ripped under the slightest bit of pressure.  I was able to fix the mishap by re-greasing my pan with cooking spray after each pancake & to make sure to wait @ least 1 minute before going anywhere near the pan with a spatula.

Since these pancakes were so light, a single service of 4 pancakes was not enough and I ended up making myself a smoothie afterwards.  Nevertheless, this was a simple & delicious introduction to gluten-free cooking.

By the way...we have yet to go on that G'free diet.


Wednesday, July 3, 2013

Risky (Meat) Business

After years of resisting, I finally broke down & got myself a Twitter account a few months ago....for the sole purpose of being able to conveniently stay up-to-date with the rest of the world.  One morning a few months ago, the American Public Health Association posted a tweet that read:
Ground beef & chicken are the riskiest meat & poultry products in the U.S. food supply, says @CSPI
I had no idea what CSPI is or how it came to that conclusion, but it appealed to my inner PH260 (principles of infectious disease) nerd & so when I got home from work that day, I followed the link on the tweet & downloaded the report.

To start off, I found out that CSPI stands for the Center for Science in the Public Interest.  Founded in 1971, CSPI is a 501(c)(3) non-profit consumer advocacy group that focuses on nutrition and food safety in the United States.  Thank you, Wikipedia. [1]

In this report, CSPI compiled and examined 1714 food-borne outbreaks that occurred in the US between 1998 and 2010. [2]  To make sure they can make a clear link between a particular meat product & an outbreak, the report only included outbreaks that were fully investigated by the CDC & were definitively linked to USDA-regulated meat & poultry products.  Of all the outbreaks examined, 564 did not have a known etiology, or pathogen.  Each of the 1700+ outbreaks were categorized into 12 groups according to its associated meat or poultry product.  To determine the foodborne disease risk of each group, CSPI calculated a "severity score" which is equal to the sum of the number of cases caused by a particular pathogen multiplied by the CDC-defined hospitalization rate of that pathogen.
Severity score of a meat/poultry product = ∑(cases)i(hospitalization rate)i
Now to to some results.  At the top of the list with the highest severity score is chicken.  Within the 12-year period examined, there were 452 outbreaks - totaling 6896 cases of illness - associated with this poultry.  The most common pathogens found in chicken were Salmonella and Clostridium perfringens.    Second on the list is ground beef with 336 outbreaks & 3800+ cases of disease.  The most common pathogen associated with ground beef was E. coli O157:H7 which caused approximately 38% of all cases.  Over the 12 years, outbreaks have led to the recall of over 70 million pounds of ground beef.  At "high risk" are steak, beef (other), and turkey.  At "medium risk" are deli meats, barbecue meats, pork, and roast beef.  Finally, processed meats such as chicken nuggets, ham, & sausages are in the "low risk" category.

Most people - if not all - have experienced at least 1 episode of foodborne intoxication/infection & it is not fun.  While most people get away with diarrhea and vomiting, many have been hospitalized & some  have even died from ingesting contaminated or improperly cooked meat/poultry.  I am a meat eater, I think meat is delicious, & reading this report is not going to stop me from eating meat.  And it shouldn't stop you either, if eating meat is your thing.  However, this report does remind me that I - along with other omnivorous & carnivorous human beings out there - should always make sure that my meat products are stored properly & that they are cooked to the right temperature.  To take this 1 step further,  it would be even better if we grind our own meat so we are assured that the end product we get started from a single source.  It's not possible for a lot of people (me included) to grind their own meat; in that case, choose products that specify a single origin (e.g. ground from whole turkey breasts).  I can't say these claims are 100% trustworthy, but that's a whole 'nother issue that I'm not prepared to tackle.
References:
  [1] Wikipedia. Center for Science in the Public Interest. Accessed 1 July 2013.
  [2] CSPI. Risky Meat: a CSPI Field Guide to Meat & Poultry Safety. Washington DC.  2013.

Saturday, May 25, 2013

Quick & Easy - 5 Minute Hummus Dip

Hummus holds a very special place in my heart.  The first time I had hummus was with my  college suite-mate when we were hanging out in her room.  From the very first dip, I was hooked...to the point where I would finish a container of Trader Joe's roasted garlic hummus by myself in 1 sitting.  I would continue this pattern of eating my friend's hummus until a Trader Joe's opened near my parents' home & I was able to get my very own.  I don't eat so much hummus anymore, but whenever I do happen to get my hands on it, you can expect me to go a little bit out of control.

I was feeling particularly snack'y the other day but I didn't want to eat my pita chips by themselves so I rummaged around my cupboards in search for a condiment.  I found no such thing but I did find a can of garbanzo beans that has been in my possession for...let's just say much longer than it should.  Hopeful to rid my home of this can of beans & inspired by the pita chips, I went for the first thing that came to mind.  A quick minute on the internet & a recipe from the magnificent Alton Brown & I'm ready to go.

No tricky ingredients...
     3 cloves garlic, peeled
     1 can garbanzo bean (a.k.a. chickpeas)
     2 tablespoons smooth peanut butter
     0.5 lemon, zest & juice
     2 tablespoons extra virgin olive oil
     Salt & black pepper to taste

No complex steps...
Drain the garbanzo beans really well & set aside
In a food processor, pulse to chop the garlic gloves
Add in the garbanzo bean & continue to pulse until it starts to look like a paste
Add in the peanut butter, lemon zest/juice, olive oil, & process until smooth
Season with salt & pepper & blend for an extra minute


Makes approximately 2.5 cups

The end product looked like store-bought hummus except slightly more liquid.  The flavor was really nice, especially the little bit of spiciness from the raw garlic.  However, there was a "raw" flavor from the garbanzo beans that was pretty prominent.  Maybe that's the disadvantage of using canned beans.  Or maybe my can had just been around for a little too long.  Traditionally, hummus is made with tahini (sesame paste) but since I didn't have any, I used peanut butter as a substitute.  I couldn't really taste the peanut butter & it didn't do anything for the texture of the hummus.  Perhaps I can use sesame oil in place of half of the olive oil next time to get that sesame flavor.  After letting the dip sit in the fridge overnight, the consistency became much thicker but the weird bean flavor was still there.  For an even healthier snack, I eat the dip with radish instead of pita chips.  Now that I know hummus isn't that difficult to make, I am going to try & come up with a copy cat version of my favorite - Trader Joe's roasted garlic hummus!

Tuesday, May 21, 2013

Quick & Easy - Seared Tuna Salad with Tangy Sesame Dressing

It was a very important time in our household last week - Russell was going to be "cashing in" months of studying & preparation to take the MCAT.  That test is not only hard because of its content, but it's also hard because it takes hours; @ least they have removed the writing section.  So on the eve of the exam, he wanted a meal that would load him up with brain- & body-boosting nutrients so he could go into the test center in tip top form.  I wasn't sure what to make but Russell suggested tuna since it's full of Omega-3 fatty acid, it's tasty, & really quick to prepare.  With that as my guide, I decided to take the rest of the meal in an Asian direction; & instead of making our usual white rice to go with the fish, I went with a hearty, bright-tasting salad.

There are some kooky ingredients that might require a trip to the store...
     2 8-ounce sushi-grade tuna filets
     0.13 cup low sodium soy sauce
     1.5 teaspoons mirin
     1.5 teaspoons honey
     1.5 teaspoons sesame oil
     3 cups romaine lettuce, chopped
     1 cup cucumber, sliced into semi-circles
     1 avocado, sliced
     0.25 cup tangy sesame dressing*

Dinner will be ready in a flash...
     In a wide dish, mix together the soy sauce, mirin, honey, & sesame oil
     Generously coat each tuna filet in the marinade
     Heat a skillet until it is very hot & sear the filets for 30 seconds on each side
     Let the filets rest for 1 minute before cutting it into thin slices
     In a large mixing bowl, combine the romaine lettuce & cucumber & toss with the sesame dressing
     Place the sliced avocado on top of the salad once it has been plated & then place the tuna on top


Makes 2 servings

This meal was super light & it was filled with a whole bunch of good-for-you nutrients.  The salad by itself is fantastic & the zippy taste is great for waking up the palate, especially on those days when the weather is hot & you feel all "bleh."

I am not a huge fan of mayo but I do love me some Japanese mayonnaise.  Before you say they are the same thing, let me assure you that they are not!  Japanese mayonnaise is more yellow in color & it tastes a lot richer than regular mayo.  Plus, it comes in this squeeze bottle with a baby printed on it & it has a star-shaped opening for decorative dispensing!  If you are really against using mayo or if you just don't have any on hand, try substituting it with dijon mustard & halve the amount of rice vinegar.  I am also contemplating making the dressing using a bit of avocado next time, but that would require the usage of my mini blender.

I didn't slice my tuna into thin pieces because it was getting torn apart by the knife & that would not make an appetizing photo.  I know that to get a tender piece of steak, I am supposed to cut "across the grain", but what about slicing tuna?  I tried to go along with the segmentation on the filet but that also did not go well...Russell's plate looked like it had been "inspected" by Sheldon before dinner was ready.

* To make the tangy sesame dressing, vigorously whisk together 2 tablespoons toasted white sesame seeds, 1 tablespoons Japanese mayonnaise, 1 tablespoons rice vinegar, 0.5 tablespoons soy sauce, 0.5 teaspoon sugar, 0.25 teaspoon mirin, 0.25 teaspoon sesame oil, & a pinch of salt.

Friday, May 3, 2013

Edible Beauty - Honey Apple Cider Vinegar Oatmeal Facial Scrub

HAPPY 100TH POST

To celebrate this momentous occasion, I am happy to introduce a new series of blog posts: Edible Beauty.  I tried to think of a more creative title but alas I was unsuccessful.  We all know eating healthy foods can help improve our bodies from the inside; but some of these same foods can also help improve our bodies from the outside...sometimes even better than the über expensive products.  So why not give them a try?

To start off the series, I want to share the recipe for a facial scrub that can either be used daily or once in a while & it promises to leave the skin feeling great for hours to come.

About a week ago, my face broke out with a ton of tiny bumps.  After browsing the web, I was pretty sure I had contact dermatitis (allergic reaction to something my face touched).  I don't know for sure how I got it but I suspect it happened when I was trying on clothes a couple of days before.  These bumps itched like crazy & the ones on my cheek even burned a bit.  I didn't want to go to the doctor because I was already doing what she would tell me to do: take antihistamine & rub hydrocortisone cream on my face.  What's worse, if I were to tell her that's what I was already doing, she might give me steroids. No, thank you!

I needed something that would relieve the itch/pain & I wanted it to be natural.  So I went browsing through the web once more & many say a facial scrub can help unclog pores & relieve my symptoms.  There are a ton of recipes for natural facial scrubs out there but settled on the one that had the properties that I was looking for & had all the ingredients in the house already!

What you will need to make this scrub...
     2 tablespoons oat meal, crust into smaller pieces
     1.5 teaspoons natural honey
     0.25 teaspoon natural, unpasteurized apple cider vinegar

In a small bowl...
     Mix everything together using your fingers until well incorporated
     Add a water if the paste is too thick, it should be thick but not paste like
     Spread the scrub all over the face using circular motion
     Leave the scrub on for a couple of minutes & then rinse with plenty of tepid water
     Pat the face dry & moisturize


For a daily scrub, ground up the oatmeal until it looks almost like a powder.  I ground up a whole bunch & keeps it in a tupperware container & just take out the amount I need.  For an occasional scrub, crush up the oatmeal a little bit with fingers or with a spoon.  The bigger pieces are going to be rougher on the skin, giving it a more thorough scrub down.

So oatmeal, honey, & apple cider vinegar; what exactly do they do & how do they benefit the skin?

As foods...
Oatmeal is great for lowering high cholesterol & high blood pressure to improve cardiovascular health.  The high amount of fiber is also good for regulating the digestive system.  Honey is a great natural sweetener that can be used to substitute sugar & it has been shown to be able to lower cholesterol.  Apple cider vinegar recently rose to superstardom for its multitude of benefits as a health food.  When consumed with water, it can aid weight loss & help detoxify the body.  When consumed by itself, it is a really good digestive aide.  Long term consumption of apple cider vinegar can lower high cholesterol, lower high blood pressure, & some even say it can relieve seasonal allergy symptoms.

As skin care ingredients...
The texture of oatmeal makes it a great exfoliant.  The saponin in oatmeal naturally cleanses pore while the protein & polysaccharides moisturize the skin.  Additionally, the Avenanthramide in oatmeal helps reduce skin inflammation.  Honey has natural antimicrobial properties which makes it great for fighting acne.  There are plenty of antioxidants in honey (especially darker ones) which makes it great for anti-aging.  Finally, the thick, sticky consistency of honey helps draw in and holds moisture in the skin.  Apple cider vinegar, being an acid, is a natural astringent that can help reduce acne & skin redness.  Also because it is an acid, apple cider vinegar can regulate the skin's pH (which is normally slightly acidic) to make it feel supple & look radiant.

I have been using the more gentle version of the scrub everyday for the last 5 days and my bumps are almost all gone.  I don't think it is all because of the scrub but it did help with the itchiness & the burning sensation.  Also, it didn't leave my skin feeling super dry & tight like it had felt when the bumps first appeared.  I don't know if the scrub has done a good job in terms of exfoliating my skin - it feels soft but not like "baby's bottom" soft - but I will probably have an answer when I go see my esthetician next week.

For $8, I can buy all 3 of these ingredients enough to make this natural facial scrub for @ least a year.  For the same amount of money, I can buy half a tube of the Body Shop facial scrub that I have been using & that would last about 4 months.  You do the math.

Saturday, April 27, 2013

Quick & Easy - Island BBQ Macaroni Salad

I recently discovered Hawaiian BBQ.  Well, I have known of it for a long time but I hadn't had the chance to try it until late last year.  Once I had my first Loco Moco, I was hooked...on the macaroni salad.  This dish is possibly one of the simplest things ever - it's pasta mixed with mayo; maybe with a little bit of shredded vegetables.  I know it is nothing special but for some reason I really like eating it, especially when I mix it together with the rice.

As much as I like Hawaiian BBQ, I don't like to get it very often because (1) there isn't a L&L or Ohno close by & (2) it's kind of overpriced for what it really is.  So to satisfy my craving, I have been attempting to do "Island BBQ" nights @ home.  It took a long time but I finally found a recipe on how to make the macaroni salad.  I probably could have done it by instinct but I can't risk messing up my favorite thing about the whole dinner plate.

It is really quite simple...
     2 cups of macaroni (aka elbow pasta)
     0.5 cups shredded carrots
     0.75 cup of mayonnaise
     Salt & pepper to taste

Really...
     Cook macaroni for 1 minute longer than package instructions
     Drain the macaroni and let it sit in the colander for 10 minutes to drain & cool
     Stir in the shredded carrots
     Add in the mayonnaise & mix until well coated
     Season with salt & pepper
     Eat warm or refrigerate until cold


Makes 3 cups

It turned out pretty well.  By cooking the macaroni for a little bit longer, the pasta was a little bit fluffier & starchier which made the salad bind together a bit more.  The original recipe that I got said to add some really finely grated onion into the mix but I found that too overpowering and bitter so I left it out.  Instead of using store bought mayo, I made one by hand so it was a little bit healthier, it didn't have all the preservatives, & the thinner consistency meant I got to use less dressing to coat the whole salad.  The overall effect was different from what I'd get @ a Hawaiian BBQ restaurant but it hit the spot.  I served it with a bit of white rice & teriyaki marinated chicken breast to complete the meal.

To make 1 cup of mayonnaise, combine 1 egg yolk, a pinch of sugar, 0.5 teaspoon salt, 0.5 tablespoon vinegar, 0.5 tablespoon lemon juice, & 0.5 teaspoon mustard in a bowl.  Slowly whip in 0.75 cup of neutral oil (i.e. canola) beginning with drops & then in a slow stream.  Keep in mind, when whipped by hand, the mayo won't come out as stiff as jarred mayonnaise.  You could also pour in the oil with the rest of the ingredients & whip using an immersion (stick) blender, that will give a final product that had much more body & more resembles store bought mayo.

Monday, April 22, 2013

Getting Canned...Episode III

A little over a year ago Russell did a 2-part guest post taste testing canned coffees, specifically Japanese canned coffees.  After 4 cans, he was finished because all the sugar was making him sick.  If you are interested, you can read his original posts here and here.

I recently went down to Los Angeles with my parents to attend my cousin Ada's wedding & on our way home, we made our obligatory stop @ the Marukai market for some fresh sashimi & fish collar.  While my parents were picking their way through the fish, I was wandering around for snacks.  I came to the refrigerated beverages aisles, saw all kinds of canned coffees that I had not seen @ home before, & it dawned on me: it's time for another round of taste test!  My dad was completely unfazed when I loaded up the shopping cart with cans & cans of coffee...but I think that's because I promised to pay him back.

When I got home & was putting the cans away, I thought that rather than putting my coffee snob of a boyfriend through another tasting, I should do it myself.  You can keep reading for the details but the take home point is "don't waste your money, it's not worth it."

Specimen #5: Dydo Original Blend Coffee
Like all the other canned coffees we have tried, this one is way too sweet; however, it did have much more coffee flavor than the ones I have had before.  Even though it doesn't look like there is milk in the coffee, it tastes a little bit like it does.
Volume: 6.7 fl. oz.  Calories: 70  Sugar: 13g

Specimen #6: Mr. Brown Iced Coffee
This coffee was not very sweet.  It was milky but not overly so.  Unfortunately it did not have a lot of coffee flavor.
Volume: 8.12 fl. oz.  Calories: 103  Sugar: 18.5g

Specimen #7: UCC Black Coffee
This is the first canned black coffee I have had & without distractions from the milk & sugar, the lack of coffee flavor really stand out.  The good thing about this is that it comes in a really cool-looking bottle.
Volume: 9.7 fl. oz.  Calories: 5  Sugar: 0g

Specimen #8: Pokka Milk Coffee
This was honestly the worst of all the canned coffees I have ever had in my life.  It was very sweet & it was very milky.  Actually, it reminded me of the milk you would have left over after finishing a bowl of fruit loops.
Volume: 8.1 fl. oz.  Calories: 100  Sugar: 16g

Specimen #9: Pokka Aromax Black Coffee
The first sip made me feel like I was drinking real, albeit pretty weak, coffee.  Unfortunately, every sip afterwards was really bland.
Volume: 5.8 fl. oz.  Calories: 0  Sugar: 0g

Specimen #10: Lotte Let's Be (Mild)
This came in very, very close to being the worst.  It wasn't coffee'y, it wasn't milky, it was just sweet.
Volume: 5.92 fl. oz.  Calories: 70  Sugar: 15g

Specimen #11: Dydo Milk Coffee - Yamitsuki
Yamitsuki in Japanese means "addicted", at least according to Google Translate.  While this was one of the better contenders of this taste test, I don't think I will ever become addicted to it.
Volume: 16.9 fl. oz.  Calories: 200  Sugar: 40g

Specimen #12: Suntory Boss Black
I was looking forward to trying this one because on the can it says "made with espresso & drip method."  The coffee tasted bland but somehow was able to leave a fairly strong aftertaste on my palette.  Bonus points for the name.
Volume: 6.52 fl. oz.  Calories: 0  Sugar: 0g


It took me about 10 days to finish trying all these cans & bottles of coffee because (1) my system doesn't handle caffeine the way it used to & (2) these just did not taste good; nor were they satisfying (they're tiny).  Like I said before, these canned coffees are not worth the money & even the black coffees were disappointing.  Should I keep trying to find the best canned coffee there is, or should I just call it a day & accept the fact that a good canned coffee probably doesn't exist?

Sunday, April 21, 2013

Quick & Easy - Faux Garlic Mash

We have been using our menu planner  for a couple of months now & usually I'm pretty good about sticking to it & having all the ingredients ready ahead of time.  But for the last week or so I have been kind of off my game in the meal planning department.  Actually, I was so bad I read the wrong line of the calendar & made salmon (on the menu the week before) instead of tuna casserole.

Anyway, I was making lamb for dinner a few nights ago & as I was putting the baggie of lamb + marinade into the fridge I noticed that I didn't have any starch or vegetables to go with the meat.  All I had in the crisper drawer were a couple of really old lemons, a few really old limes, & half a head of leftover cauliflower.  I didn't want to go out to get new produce since it was closing in on 5pm but we had cauliflower not too longer ago & Russell isn't exactly a fan of it.  Alas, I must work with what I had...but there has to be some way to jazz it up.

I had been reading a lot about new ways to use cauliflower so I thought I would give it a try.  A quick few minutes on Google & I was ready & armed with a highly rated recipe from Food Network.

The ingredients list seems much shorter than for real mashed potatoes...
     0.5 head cauliflower, cut into medium-sized chunks
     0.1 cup grated pecorino romano cheese
     2 cloves garlic, peeled
     1 tablespoon unsalted butter
     Salt & pepper

And the directions seem that way too...
     Boil the cauliflower chunks until they are soft (~6 minutes)
     Drain the cauliflower & pat the chunks dry while still hot
     In the food processor, combine cauliflower, cheese, garlic, & butter; blend until almost smooth
     Season with salt & black pepper to taste


Makes 2 cups

I had Russell taste the mash for seasoning & he could not tell it was not potato.  In the middle of dinner, I finally let him know he was not eating mashed potato.  He proceeded to guess a variety of vegetables but he could not believe it was cauliflower, even when I told him that's what it was.  The original recipe called for cream cheese which I didn't have so I used butter instead.  It did the job but I think the cream cheese would have made the mash a little bit thicker in texture & resemble slightly more like potatoes.  I did some rough calculations & this recipe comes out to approximately 112 Calories per serving while good 'ol homemade garlic mashed potatoes made with light cream is about 300 Calories per serving.  I am not saying I am going to completely give up my mashed potatoes but on days when I would like to indulge but really shouldn't, this comes in as a great option.

Wednesday, April 3, 2013

Marnee Thai Closed After "F" From Health Inspector

I love Thai food.  Sadly, Russell can't stand having it but once a year & that's only because he wants to hear people say "Happy New Year" in a Thai accent.  The good news is, we have started making some progress in increasing Russell's tolerance for Thai food.  The bad news is, our favorite Thai restaurant is now temporarily closed after getting an "F" from the San Francisco Department of Public Health.

During a health inspection on Monday, Marnee Thai @ 9th/Irving received a food safety score of 58 (out of 100) & is now shut down pending re-inspection.  The immediate closure is also prompted since the restaurant failed to clean up its act from a previous citation that happened in January 2012.  Among the long list of health violations were "live cockroaches on prep table/shelving," "rodent droppings on floor and shelving," and "utensils stored in/on surfaces with a build-up of debris, food residue, grease, and grime."  According to an article on Inside Scoop SF, a spokesperson for Marnee Thai expresses that she is hopeful the restaurant will reopen for business within the next week after they have corrected their violation.

In addition to this week's low scoring, the 9th/Irving branch of Marnee Thai has received mediocre food safety scores in the past.  According to records at the San Francisco Department of Public Health, the restaurant received a score of 71 in May 2011 which dropped to a 66 in December 2011.  Across all available inspection reports, the restaurant has consistently been in violation of having "high risk food holding temperatures."  Comparatively, the other branch of the restaurant - located on Irving between 23rd and 24th - received a score of 86 during an inspection in February.

In my experience, I have eaten @ seemingly dirty restaurants & was able to leave with my health intact.  I have also eaten @ seemingly clean restaurants only to have to rush home to use the little girl's room.  Food safety scores aren't everything & it alone certainly won't deter me from going to any particular restaurant.  However, having a knowledge of this score & knowing where to access it can be very helpful.  And it can help pass hours and hours of time.  If you ever want to know the scores of any restaurant in San Francisco, you can visit the public health department's Food Safety Program website.

You can find the entire food inspection report on Marnee Thai here.


Monday, March 25, 2013

7x7 Big Eats 2013 - Old Jerusalem Restaurant


Location: 2976 Mission Street, San Francisco, California 94110
Date: Saturday, March 23rd
Food: Stuffed falafel
Price: $1.25 each
Comments: I haven't had many falafels in my lifetime but these were really, really delicious.  The crust is crispy but not oily & the inside wasn't too dense or mushy.  There were whole pine nuts mixed together with the chick peas to add crunch  & the chopped onion on the bottom added moisture.  It's slightly larger than a regular falafel but not as large as I'd expected for a falafel that is supposedly "stuffed".

Monday, March 11, 2013

From the Oven - Irish Car Bomb Cupcakes

You know that saying about how when there are too many coincidences it's no longer a coincidence?

Well it was a coincidence that:
  1. I found a really interesting chocolate cake recipe on Pinterest that I was dying to try.
  2. There is Baileys that's been sitting in my fridge for way too long.
  3. Russell has a new food-related toy that I gave him for his birthday that he has yet to try out.
  4. We need to get beer for the house.
  5. St. Patrick's Day is just around the corner!
With all these coincidences in front of me, I had no other choice but to use them to my favor...& make them into not a coincidence.

I had to substitute a couple of the ingredients...
     4 ounces all-purpose flour
     0.6 teaspoon baking soda
     0.25 teaspoon salt
     1.5 ounces all natural cocoa
     5 ounces sugar
     0.5 cup hot chocolate
     4 ounces butter
     0.75 cup Guinness
     1 egg
     0.5 teaspoon vanilla extract

Then it's melt, dump, & stir...
     In a small bowl, whisk together flour, baking soda, & salt
     In a pot, heat the cocoa, butter, sugar, & hot chocolate until the butter is melted; cook for 10 minutes
     To the chocolate mixture add in the Baileys, whisk in the egg, & then add in the vanilla
     Slowly sift the dry ingredients into the wet ingredients, mix everything together until well incorporated
     Pour the batter into a cupcake tin already lined with wrappers
     Bake at 320F for 30 minutes
     Remove cupcakes & put them on a wire rack until they are cooled completely


Makes 12 cupcakes

Theses cupcakes are so good!  I honestly think these are the best things I've ever made out of an oven.  The cupcakes were moist, chocolatey, not too sweet, & end with just a hint of bitterness from the Guinness.  I think the flavors would have been much more balanced if I had used coffee instead of hot chocolate but I didn't have any coffee in the house.  Never did I envision a day when there would be no coffee in my house.  Ugh!  To complete the cupcakes I topped them with a Baileys whipped cream.  I must admit that I didn't make the whipped cream; nor was it made using conventional methods.  The truth is, Russell made the topping by combining heavy whipping cream & Baileys in his fancy siphon food whipper & then aerosolized it by adding in nitrous oxide (N2O).  The whipped cream tasted really strong so I might do a café au lait frosting next time instead.

I wasn't sure what to these cupcakes because someone once told me that Irish car bomb is an offense name.  S/he didn't tell me why & I never figured it out; I still haven't figured it out.  Also, I didn't think this was truly really an Irish car bomb since it lacked the Jameson whiskey.  I want to try & include the whiskey into the recipe next time to accurately represent the drink I've named it after.  Maybe I should half the coffee & replace it with the Jameson.  Or Maybe I should just go with all Jameson!


Sunday, March 3, 2013

7x7 Big Eats 2013 - Nopalito


Location: 1224 9th Avenue, San Francisco, California 94122
Date: Saturday, March 2nd
Food: Caldo Tlalpeño
Price: $10.00
Comments:  I am not sure what I want to say about this soup.  I thought the chicken broth was flavorful but it was too spicy because I left the chipotle pepper in the bowl for too long.  There was plenty of vegetables in the soup but somehow it wasn't satisfying...I think I needed some shredded chicken or some other form of protein in there to make me feel like I had a complete entrée.  The warmed avocado was interesting texturally since the very first sensation is slightly mushy but then it becomes more firm afterwards.  My favorite part of the entire bowl was the cauliflower - the florets were not too cooked & the spice from the broth took away some of the grassy taste cauliflower can have.

Friday, March 1, 2013

From the Oven - Fluffy Mini Chocolate Chip Cookies

Ever since I got a Pinterest account months ago, I have been seeing this one pin for fluffy & chewy chocolate chip cookies repeatedly.  Since I was in the mood to make some CCCs & didn't want to make our usual America's Test Kitchen recipe - too labor intensive - I thought I would give this popular recipe a try.

They say the trick lies with the cornstarch...
     0.75 cup unsalted butter, softened
     0.75 cup light brown sugar
     0.25 cup granulated sugar
     1 egg
     2 teaspoons vanilla extract
     2 cups all-purpose flour
     2 teaspoons cornstarch
     1 teaspoon baking soda
     0.25 teaspoon salt
     1 cup bittersweet chocolate chips

Just dump, stir, & scoop...
     In a medium mixing bowl, cream together butter & both sugars until really light & fluffy
     Add in the egg & vanilla extract & blend
     Add in flour, cornstarch, baking soda, & salt into the mixture; mix everything together gently
     Mix in the chocolate chips
     Scoop the dough with a tablespoon & place them onto a baking sheet lined with parchment paper
     Bake at 350F for 10 minutes


Makes about 30 cookies

I have made these cookies twice & they turned out good both times.  The first time, I used an electric mixer for all the steps & the cookie dough felt a little dry.  The cookies were fine but it was difficult to scoop.  The second time I made these, I only used an electric mixer to cream the butter & sugar & used a rubber spatula for the rest of the steps.  This time, the cookie dough was more pliable & it spread out a bit more in the oven.  These cookies are not meant to flatten out very much so if they do, it might mean the cookie dough was a little too warm before going into the oven.  Try refrigerating the dough for 20 minutes to firm everything up first.  Also, it helps to make sure that the butter is softened but not too soft.  When it comes to texture, these cookies delivered on the promise & were chewy & fluffy without feeling like it wasn't cooked all the way through.  In terms of flavor, these were nice & not too sweet.  Mine had a weird after taste to them that only I tasted (I asked Russell & my parents; they all said no) which I suspect might have to do with my really old corn starch & baking soda that has been sitting in my cupboard, exposed.  I wish things like baking soda, baking powder, & corn starch would come in resealable packages or come in much smaller quantities because it takes forever to go through one of those things!  But I digress...

I feel that I am @ a cross roads.  While I like these cookies for their texture, they lack that flavor that gets evoked in my mind when someone says "chocolate chip cookies."  Perhaps I will try to substitute cornstarch into my go to CCC recipe & see what happens.  But first I have to go get some new corn starch.

Wednesday, February 27, 2013

"Tortoise Tower" Chicken Pho

As you might have read in one of my previous posts, Russell turned (29+1) earlier this month & I wanted to make his birthday extra special by cooking him some delicious food.  Even though I am more Chinese - genetically & culturally - than he is, I had never heard of the Chinese tradition of eating chicken on one's birthday before I met the guy.  He told me that in the Taishan (Toi-San, 台山) dialect, the word for "chicken" sounds very similar to the word for "luck" so a person should eat chicken on his/her birthday in order to ensure good luck in the year to come.

I was originally planning on making surf-&-turf, but chicken is good...until...

Me: "So what kind of chicken do you want me to make?  Fried?  Chicken wings?"
Him: "How about chicken pho?"
Me: "You want to go to out for your birthday?"
Him: "No.  I want you to make it...from scratch."

Seriously?!?

I didn't hit the panic button just quite yet.  His mom had gotten me a cookbook for Christmas that was all about Vietnamese home cooking.  Lo & behold there is a recipe for chicken pho in there.  Phew.  But still, can I tackle making pho?

Watch out for the "trick ingredient"...
     1 chicken, about 3 pounds
     6 whole scallions
     1 2-inch piece of ginger, crushed
     1 tablespoon salt
     0.5 package thick vermicelli noodles
     6 cups homemade chicken stock*
     2 tablespoons fish sauce
     1 scallion, chopped
     0.25 cup cilantro, chopped

And it takes longer than one'd think...
     In a large pot, bring some water (~6 cups) to boil
     Add in the chicken, scallion, ginger, & salt.  Bring back to a boil for 20 minutes
     Remove the chicken & place it in an ice bath for 20 minutes
     Remove the chicken from the ice bath, pat it dry, remove the skin, & shred up the meat
     Cook the vermicelli noodles according to the package instructions
     Boil the chicken stock, seasoning with fish sauce to taste
     In a bowl, place the vermicelli noodles, the chicken meat, & then pour over with the hot broth
     Garnish with chopped scallion & cilantro


Makes 2 servings

What seemed complicated @ first turned out to be more time consuming than anything else.  The end result was not too shabby.  The noodles could have been cooked a little longer & the broth could have used a bit more salt, but that was about it.  The "trick ingredient" I mentioned above is the homemade chicken stock.  I actually went ahead & made one a day ahead & it took about 5.5 hours start to finish.  I think it's nice to have a homemade stock but it is by no means necessary in my opinion.  Actually, store-bought stocks are much more flavorful than the one I made.

So why am I calling my chicken pho "Tortoise Tower" chicken pho?  For those of you who live in or around San Francisco, you might know of a Vietnamese restaurant called Turtle Tower that is quite famous for its chicken pho.  As a matter of fact, it is the only place I get chicken pho.  Since I was trying to riff off Turtle Tower, I thought I should give my dish a cleaver name that involved a similar reptile.  If you want, you can read more about the real Turtle Tower chicken pho here.


* To make the chicken stock, roast 0.5 yellow onion & 1 3-inch piece of ginger at 350F for 1 hour.  Blanch 3 pounds of chicken scraps (i.e. neck, wings) in boiling water for 3 minutes & rinse.  Cut the roasted onion in half & the roasted ginger into coins.  In a large pot, bring to boil 8 quarts of water along with the chicken, onion, ginger, 0.75 tablespoon salt, & 0.75 tablespoon palm sugar.  Reduce heat to a simmer & let it go for 4 hours.  Remove any large solids & strain the broth through a fine mesh strainer.  Refrigerate or freeze in air tight containers.


Sunday, February 24, 2013

7x7 Big Eats 2013 - Irving Cafe & Deli


Location: 2146 Irving Street, San Francisco, California 94122 
Date: Sunday, February 24th
Food: Banh-Mi
Price: $4.00-$4.50
Comments: I got the combination pork sandwich which was pretty disappointing.  I have only had a few Banh-Mi sandwiches in my lifetime but I know they are supposed to have quite of bit of pickled vegetables.  This sandwich had only shredded carrots & 1 piece of cucumber that was slightly pickled (if @ all).  There were 3-4 different types of pork products but they all tasted very similar in their seasoning except for the paté which was so flavorful, it overwhelmed everything else.  This is also where the acidity from the pickled vegetables would have helped a lot.  The best thing was the bread which remained crispy even after sitting in the wrapper for 30 minutes.  The price was reasonable & the service was quick but I don't think I will stop in for another sandwich any time soon.